SwiftUI Game
On the quest to develop a few games this year, pun intended, I have honed in a litte of the first game’s style. In my head I would like to make a fairly large, 2D action-roguelike game where your character has to traverse an infinite number of “levels”, ward off the baddies and manuever whatever the story is. Battling will be an old-school, first-person view with enemies lined up in front and then tap or swipe actions as the mechanic. In this article I’ll walk through how I’m currently presenting Enemies on the Battle Screen- including enemy placement and handling attacks from the player. It’s a pickle!
A photo is worth a thousand words so let’s begin with the end in mind
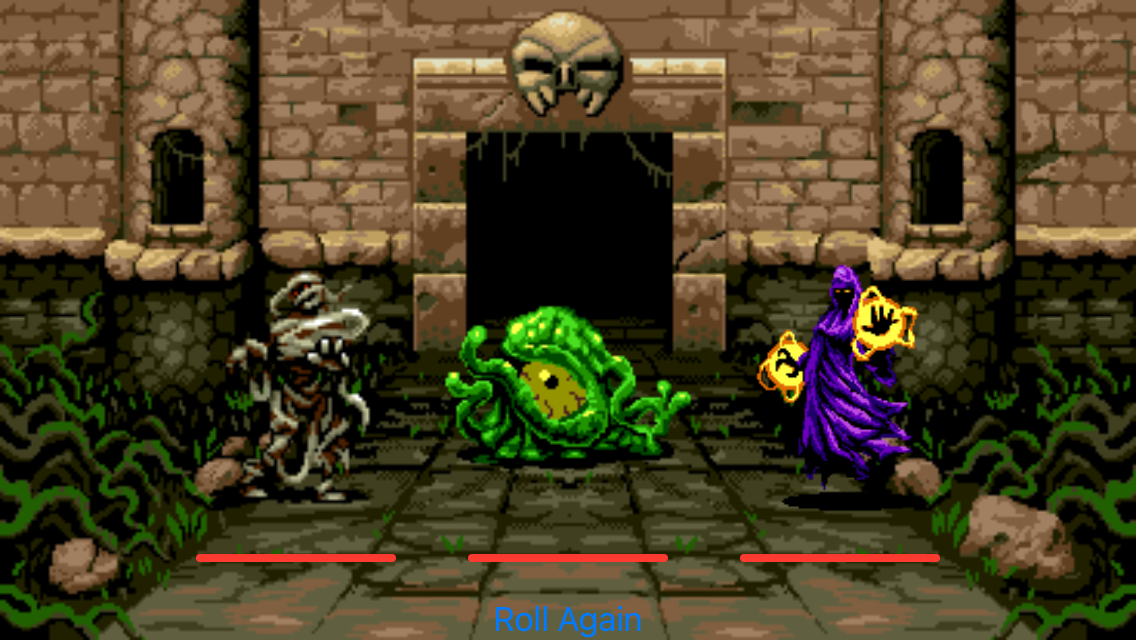
Cool! I am using the “Roll Again” button as a live debug and that would be removed from a final build, but overall I’ve got a basic, Battle Screen. Even cooler everything on the screen is a basic SwiftUI entity, such as Image or ProgressView.One of my goals with this project is to learn SwiftUI and sticking to the this goal creates an interesting problem when developing a game because most the user interface elements are custom. While I am going to use SpriteKit to handle the Over World for this little game of mine I believe most of the logic for this screen doesn’t require the overhead of an engine.
Reviewing the code at the beginning I create a View struct and define a few initial variables. The shift in mindset from classes to structures has been an interesting one, and something that I might write about in the future as there are places I still use them in conjunction, but for now the overall layout of the enemey is a VStack that contains an Image and ProgressView.
1 | struct EnemyView: View |
I’m taking some liberties with dimensions, but this builds the Enemy view and provides a tangible structure for the UI. By leveraging a ProgressView we get all of the standard health bar look and feel for free, and decrementing works just as well as incrementing values. Armed :) with all of this we need to add some interactivity. Long term I believe I want to create custom gesture handlers for magic attacks but for now taps and long presses will suffice and once again rudimentary SwiftUI is perpetuating my laziness paying dividends. Since I’m using an Image to represent our Enemy taps, and in the future custom gestures, are easily attached as handlers to the Image itself.
1 | Image(imageName) |
From here it is just a matter of determing the attack logic for each gesture. Something as simple as deducting ten points from the total health on a tap and completely obliterating the health on a long press will work (which is lucky because the comments are already written above) Most of the code again does not change but at a high level three new variables are introduced to track the damage the enemy takes per hit (damageTaken), whether or not the enemy’s image should be shown (isPresented), and the total health of the enemy (health). Then inside of the gestures checks are made against the Enemy’s health and damage applied.
1 | struct EnemyView: View |
Finally I add a little pizzaz by replacing the Image when health is depleted. SwiftUI suggests? a pattern of leveraging booleans for visibilty of UI elements. This can be best understood with an ActionSheet whose presentation is handled by a boolean parameter that is most often a State variable. Adjustments to that boolean parameter control presentation versus a call to the ActionSheet itself so instead of saying myActionSheet.show() I update myParentView.isPresented = true and the sheet will render. For our app I’m leveraging the same basic pattern but applied to the Image presented to the user.
1 | struct EnemyView: View |
I could do this in a few different ways, for instance simplying using one Image and adjusting the imageName or imageName itself could be a State variable with updates handled automatically, but I like this to provide a clear distinction between the image representing the Enemy and the image representing the Enemy’s “loot”. With this structure this could eventually be represented by another object entirely, for instance an Item object, but that would be an enhancement for a different day.
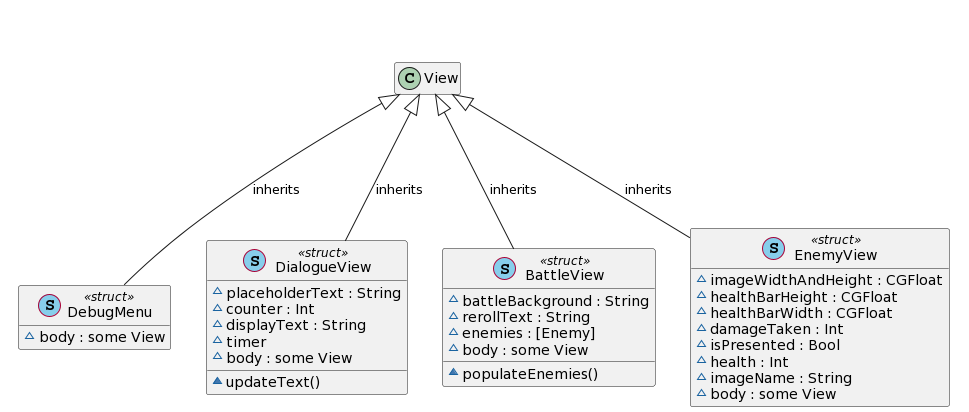
One final note is where this Enemy class fits into the broader architecture of the game so far. To get a view of this I leverage a tool called PlantUML and generated a Class Diagram for the app so far.